































FLASH SALES: discover new varieties on offer every week!

Cucumber

← Back to Blog homepage

Our latest articles
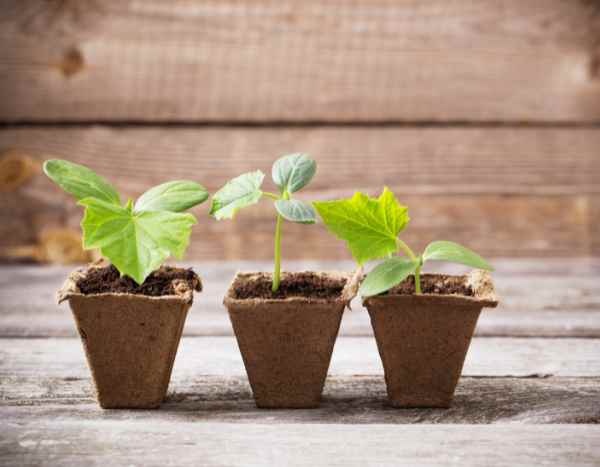
How to sow cucumber

Quick overview
- Best time: sow under cover 3–4 weeks before last expected frost, or sow direct outdoors after soil reaches consistently 15°C–18°C.
- Soil: fertile, well‑drained, rich in organic matter; pH 6.0–7.0.
- Temperature: germination optimal 18–25°C.
- Sowing depth: 1–2 cm.
- Seed spacing: indoors in pots or modules: one seed per cell; outdoors or in growbags: thin to 30–45 cm between plants (depending on variety).
- Light: plenty of bright light once seedlings emerge; avoid cold drafts.

Step‑by‑step (indoor sowing, recommended for cooler climates)
1. Prepare compost and pots
- Use free‑draining multi‑purpose compost with added compost or well rotted manure for extra fertility. Fill 7–9 cm pots or modules, firm lightly.

2. Sow seeds
- Place one seed 1–2 cm deep in each pot or cell. Water gently to settle compost.

3. Provide warmth
- Keep pots at 18–25°C. Use heated propagator or warm windowsill. Germination usually 5–10 days.

4. Light and ventilation
- Move seedlings to bright light as soon as they appear. Reduce temperature a little by day to encourage sturdier growth. Provide gentle airflow to reduce damping‑off.

5. Pot on and feed
- When seedlings show 2–3 true leaves, transfer to larger pot if needed. Start weekly feed with balanced liquid feed or dilute tomato/cucumber fertiliser.

6. Harden off
- Gradually acclimatise plants to outdoor conditions over 7–10 days before planting out or into greenhouse.

Planting out and training
- Plant into greenhouse, polytunnel or sheltered sunny site after risk of frost has passed and when soil/air are warm. Space plants 30–45 cm apart along rows or use single plants in growbags.
- Provide support: trellis, canes or string to train vines upwards. Training saves space and improves air circulation.

Outdoor direct sowing
- Sow seeds 1–2 cm deep in warm soil from late spring onwards. Sow in hills of 3 seeds, thin to strongest seedling per hill. Direct sowing suits early summer in reliably warm sites.

Watering and care
- Keep soil consistently moist but not waterlogged. Water at soil level to avoid wetting foliage.
- Mulch to conserve moisture and suppress weeds.
- Side‑dress with compost or feed fortnightly during heavy fruiting.

Common problems
- Poor pollination in greenhouse: hand‑pollinate flowers if necessary.
- Powdery mildew and downy mildew: ensure good airflow, avoid overhead watering.
- Pests: aphids and slugs can be an issue; monitor and control early.

Harvest
- Pick cucumbers when fruit reach variety‑specific size and before seeds harden. Regular harvesting encourages more fruiting.

Variety note
- Choose variety suited to greenhouse (parthenocarpic varieties do not need pollination) or outdoor cropping.

Happy sowing — cucumbers are quick to reward once warm conditions are established.
On page one

Choosing

How to sow cucumber Quick overview - Best time: sow under cover 3–4 weeks before last expected frost, or sow direct outdoors after soil reaches consistently 15°C–18°C. - Soil: fertile, well‑drained, rich in organic matter; pH 6.0–7.0. - Temperature: germination optimal 18–25°C. - Sowing depth: 1–2 cm. - Seed spacing: indoors in pots or modules: one seed per cell; outdoors or in growbags: thin to 30–45 cm between plants (depending on variety). - Light: plenty of bright light once seedlings emerge; avoid cold drafts. Step‑by‑step (indoor sowing, recommended for cooler climates) 1. Prepare compost and pots - Use free‑draining multi‑purpose compost with added compost or well rotted manure for extra fertility. Fill 7–9 cm pots or modules, firm lightly. 2. Sow seeds - Place one seed 1–2 cm deep in each pot or cell. Water gently to settle compost. 3. Provide warmth - Keep pots at 18–25°C. Use heated propagator or warm windowsill. Germination usually 5–10 days. 4. Light and ventilation - Move seedlings to bright light as soon as they appear. Reduce temperature a little by day to encourage sturdier growth. Provide gentle airflow to reduce damping‑off. 5. Pot on and feed - When seedlings show 2–3 true leaves, transfer to larger pot if needed. Start weekly feed with balanced liquid feed or dilute tomato/cucumber fertiliser. 6. Harden off - Gradually acclimatise plants to outdoor conditions over 7–10 days before planting out or into greenhouse. Planting out and training - Plant into greenhouse, polytunnel or sheltered sunny site after risk of frost has passed and when soil/air are warm. Space plants 30–45 cm apart along rows or use single plants in growbags. - Provide support: trellis, canes or string to train vines upwards. Training saves space and improves air circulation. Outdoor direct sowing - Sow seeds 1–2 cm deep in warm soil from late spring onwards. Sow in hills of 3 seeds, thin to strongest seedling per hill. Direct sowing suits early summer in reliably warm sites. Watering and care - Keep soil consistently moist but not waterlogged. Water at soil level to avoid wetting foliage. - Mulch to conserve moisture and suppress weeds. - Side‑dress with compost or feed fortnightly during heavy fruiting. Common problems - Poor pollination in greenhouse: hand‑pollinate flowers if necessary. - Powdery mildew and downy mildew: ensure good airflow, avoid overhead watering. - Pests: aphids and slugs can be an issue; monitor and control early. Harvest - Pick cucumbers when fruit reach variety‑specific size and before seeds harden. Regular harvesting encourages more fruiting. Variety note - Choose variety suited to greenhouse (parthenocarpic varieties do not need pollination) or outdoor cropping. Happy sowing — cucumbers are quick to reward once warm conditions are established.

by Gwenaëlle
5 April 2026
  1. Which plants pair well with cucumbers?

    Choosing

    Which plants pair well with cucumbers?

    by Pascale

    2 February 2026 6 min.
  2. The Bur cucumber: how to grow this unusual fruit-vegetable?

    Choosing

    The Bur cucumber: how to grow this unusual fruit-vegetable?

    by Pascale

    1 February 2026 4 min.
  3. Cucumbers in the vegetable patch: how to grow them vertically?

    Cucumbers in the vegetable patch: how to grow them vertically?

    by Olivier

    13 August 2025 7 min.
  4. Cucumber and gherkin diseases and pests

    Choosing

    Cucumber and gherkin diseases and pests

    by Pascale

    13 January 2026 5 min.
  5. Vegetables and fruits to nibble in the vegetable garden

    Choosing

    Vegetables and fruits to nibble in the vegetable garden

    by Pascale

    7 January 2026 4 min.
  6. Fruit vegetables: 7 essential varieties

    Vegetables and fruits

    Fruit vegetables: 7 essential varieties

    by Solenne

    25 August 2025 8 min.
  7. Cucumber and gherkin: sowing, planting, cultivation, pruning

    Choosing

    Cucumber and gherkin: sowing, planting, cultivation, pruning

    by Aurélien

    5 August 2025 14 min.
  8. Cucamelon: a mini watermelon with cucumber flavour

    The blog

    Cucamelon: a mini watermelon with cucumber flavour

    by Ingrid

    12 March 2026 2 min.
  9. Balcony vegetable garden: 15 mini-vegetables perfectly suited to balconies

    The blog

    Balcony vegetable garden: 15 mini-vegetables perfectly suited to balconies

    by Ingrid

    12 March 2026 5 min.
  10. Ice Saints: dates, origin and advice

    The blog

    Ice Saints: dates, origin and advice

    by Ingrid

    12 March 2026 2 min.

Most read

  1. 1
  2. 2

    Le kéfir de fruits (ou water kefir) est une boisson fermentée pétillante, légèrement acidulée et probiotique, obtenue grâce à des grains de kéfir (symbiose de levures et bactéries). Voici une méthode simple pour en faire chez vous. Ingrédients et matériel - Grains de kéfir de fruits : 2–4 cuillères à soupe pour 1 litre d’eau. - Eau non chlorée (eau de source ou eau du robinet filtrée et décantée) : 1 litre. - Sucre : 50–70 g (3–4 c. à soupe) par litre. Sucre de canne blanc fonctionne bien ; vous pouvez ajouter 1 c. à café de mélasse ou un morceau de figue sèche pour les minéraux. - Une pincée de sel marin non iodé. - 1 ou 2 figues sèches ou une tranche de citron non traité (facultatif, pour mineraux et goût). - Un bocal en verre d’environ 1–1,5 L. - Couvercle respirant (mousseline, tissu fin) et élastique, ou couvercle non hermétique. - Passoire en plastique (éviter tamis métallique prolongé). - Cuillère en bois ou plastique. - Bouteilles fermées (type bouteilles à bouchon mécanique) pour la seconde fermentation. Étapes — fermentation primaire 1. Dissoudre le sucre : chauffez un peu d’eau pour y dissoudre le sucre, ajoutez la pincée de sel. Complétez avec le reste d’eau froide jusqu’à 1 litre. Laisser refroidir à température ambiante (30 °C max). 2. Mettre les grains : versez l’eau sucrée tiède dans le bocal, ajoutez les grains de kéfir et, si vous le souhaitez, la figue sèche ou la tranche de citron. 3. Couvrir et laisser fermenter : couvrez le bocal avec un tissu et un élastique (ou un couvercle légèrement posé) et laissez fermenter à température ambiante, à l’abri du soleil, pendant 24 à 48 heures. Durée courte = boisson plus sucrée, durée longue = plus acide et moins sucré. 4. Goûter : après 24 h, goûtez ; poursuivez si vous souhaitez plus d’acidité. Récupération des grains et seconde fermentation (carbonatation et aromatisation) 5. Séparer : filtrez la boisson avec la passoire en plastique pour récupérer les grains. Ne pas utiliser d’ustensile métallique pendant longtemps. 6. Remettre les grains au travail : placez les grains dans un nouveau litre d’eau sucrée pour relancer une nouvelle fermentation. 7. Aromatiser et mettre en bouteilles : versez la boisson filtrée dans des bouteilles hermétiques, ajoutez fruits, jus (ex. morceaux de framboise, gingembre, tranche d’orange) pour parfumer. Fermentez 24–48 h à température ambiante pour développer la carbonatation. 8. Réfrigérer : mettez les bouteilles au réfrigérateur pour ralentir la fermentation et boire frais. Ouvrez prudemment (libérez la pression progressivement). Conseils et bonnes pratiques - Eau : évitez eau chlorée. Si vous n’avez que de l’eau du robinet, laissez reposer 24 h ou faites bouillir puis refroidir. - Sucre : la quantité peut varier selon goût et activité des grains. Les grains « mangent » le sucre ; la boisson finale contient moins de sucre que la solution initiale. - Température idéale : 20–28 °C. Trop froid = fermentation lente ; trop chaud = risque d’endommager les grains. - Métal : éviter contacts prolongés avec métal ; cuillère en bois/plastique et passoire plastique préférables. - Nettoyage : bocaux et bouteilles propres, mais pas nécessaire de stériliser systématiquement. Si problème (moisissure), nettoyez soigneusement et jetez grains contaminés. - Mouldes et sécurité : si vous voyez moisissure (fuzzy, colorée) ou odeur putride, jetez boisson et grains. Ne pas consommer. - Rincage des grains : pas nécessaire à chaque cycle ; ne rincez qu’en cas d’odeur ou lors d’un changement important de sucre. - Stockage des grains : pour pause courte (1–2 semaines), placez-les dans de l’eau sucrée au réfrigérateur. Pour plus long, déshydrater ou congeler suivant protocoles spécifiques. - Dépannage : - Boisson trop sucrée : prolonger la fermentation ou ajouter quelques grains. - Trop alcoolisée/acidulée : réduire durée de fermentation ou mettre en réfrigérateur plus tôt. - Grains qui diminuent : apporter parfois une petite cuillère de mélasse ou changer type de sucre temporairement pour les fortifier. Précautions - Les boissons fermentées contiennent de faibles quantités d’alcool et des micro-organismes vivants. Si vous êtes immunodéprimé, enceinte ou avez des soucis de santé, consultez un professionnel de santé avant consommation. - Respectez l’hygiène et surveillez visuellement et olfactivement pour détecter altérations. Voilà — avec ces bases vous pouvez expérimenter saveurs et temps de fermentation pour obtenir un kéfir de fruits à votre goût. Souhaitez-vous une recette précise avec proportions pour une bouteille aromatisée (par ex. gingembre-citron) ?

    by Ingrid

    7 July 2026
  3. 3
  4. 4
  5. 5
  6. 6
  7. 7
  8. 8
  9. 9