


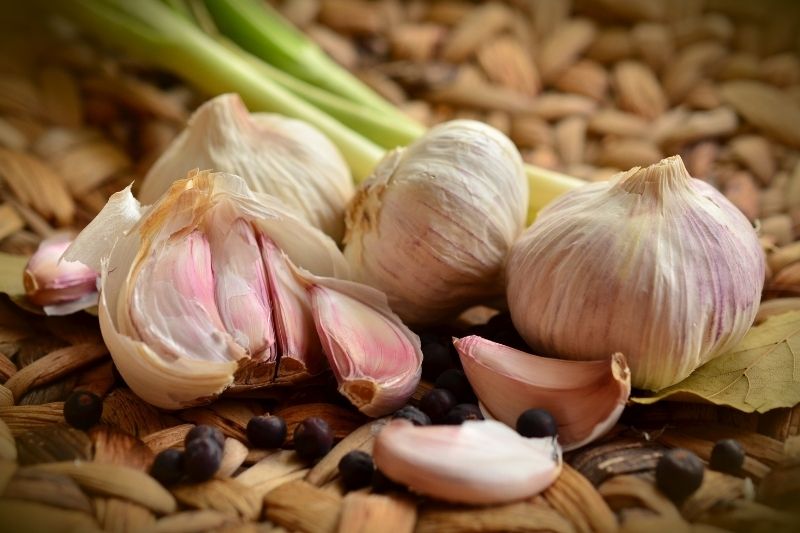
Garlic (Allium sativum) is a perennial plant, grown as an annual, with an underground bulb. Member of the family Alliacées, garlic takes the form of a head (the bulb) made up of an agglomeration of bulbils, sometimes called pods, around a central stem, soft or hard, and covered by a tunicate, that is, a plant peel. As for bulblets, these are seeds produced in the capsule at the end of the flower stalk.
To multiply garlic, two techniques exist: division of bulbils and planting of bulblets. Discover these two propagation methods step by step.
Multiplying garlic by separating bulbils
Division of bulbils is the most common method to multiply and obtain new heads of garlic. It produces new bulbs. However, it is essential to choose bulbs of a good size to make separation of the pods easier, and above all healthy and free of any injury.
To increase bulb size, in June–July either remove flower stalks or tie the stems when foliage yellows. This way, garlic will devote all its energy to feeding the bulb, which will swell.
Required equipment
- A fairly wide terracotta pot, imperatively perforated.
- A light substrate, such as seed sowing compost.
- A spray bottle for watering as a fine spray.
When to proceed?
This division of bulbils generally takes place in autumn, between September and October.
How to multiply bulbils in a pot?
- Take a healthy, good-sized head of garlic containing a good number of bulbils. Prefer avoiding culinary garlic heads from shops, as they are not certified healthy for growing.
- Remove outer covering surrounding the bulb.
- Separate bulbils by hand, taking care not to damage them, as the slightest injury can affect their development.
- Keep for planting only pods from the outside, often noticeably larger. Others can be eaten.
- Plant two to three bulbils in the pot, point upwards, about 2 cm deep.
- Cover with compost and water with a fine spray.
- Place pot in sun, outdoors and sheltered from frost which can "kill" the bulb.
Water once a week with a fine spray and without excess. After a few weeks, bulbs will produce shoots. When shoots reach 10 cm, cut them leaving 3 to 5 cm. Bulbs will then develop and enlarge.
Normally, in late summer, when shoots are dry, it is possible to dig up heads of garlic, which will consist of several bulbils.
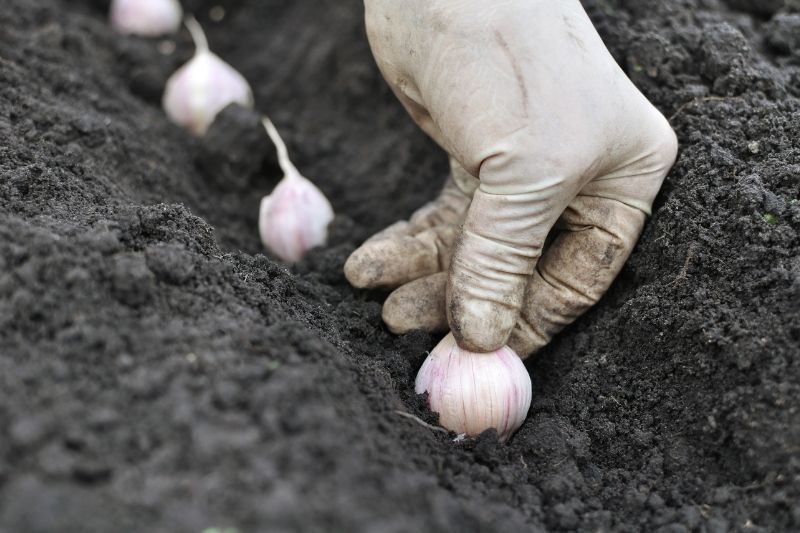
How to plant bulbils in open ground?
Same method can be used in open ground:
- Choose a sunny spot, with light, well-drained soil, and well weeded. However, apply strict rotation: soil must not have hosted garlic for at least 5 years.
- Loosen and aerate soil well.
- Dig a furrow 3 to 4 cm deep.
- Plant bulbils, point upwards, every 10 cm.
- Cover with a thin layer of soil.
- Water with a fine spray if it does not rain.
Multiplying garlic using bulblets
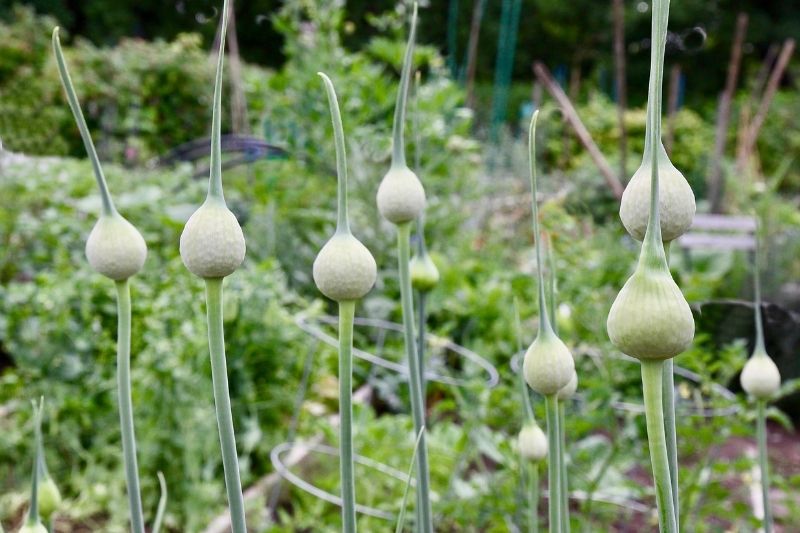
This bulblet propagation method is only possible for varieties that produce flower stalks! These are hard-neck or stiff-stem garlics such as rocambole garlic, or varieties like ‘Rose de Lautrec’, Auvergne garlic, Cadours purple garlic, Rose du Tarn garlic, Lomagne white garlic, Provence purple garlic… By contrast, soft-neck garlics, such as ‘Messidrome’, do not produce flower stalks.
Very occasionally, especially during drought, soft-neck garlics can produce kinds of bulblets in the pseudo-stem. They can be used.
As a reminder, bulblets are in a way aerial bulbils. These are round bulbs, true clones of the mother plant, formed of a single bulbil.
Advantages and disadvantage of bulblet propagation
Among advantages, note financial aspect. Indeed, a flower stalk can produce up to a hundred small bulblets. Also, having no contact with soil, they are more likely free of diseases. Finally, these bulblets allow production of larger, more vigorous garlic. However, this method requires some patience, as it spans two to three years.
When to harvest bulblets?
Flower stalks are generally cut in late summer. They were produced by garlic left to develop without intervention. Bulblets appear at end of a flower stalk that sometimes grows in a spiralled form. Wait until flower stalk has browned, sign it has reached ripeness. Simply cut whole flower head and store until time to plant bulblets, in September or October.
Bulblets can be planted in pots or in open ground. Planting in open ground must be done in a clearly identified plot, well in sun and with light, drained, fertile soil.

How to plant bulblets?
- Break apart flower head to recover all bulblets.
- Fill perforated pots with a light, rich substrate, such as a good-quality universal compost.
- Plant bulblets point upwards at 2 cm depth.
- Water lightly as a fine spray.
- Store pots outdoors, in sun and sheltered from frost. To keep bulblets warm, mulch substrate if desired.
Planting bulblets in open ground is done in furrows 2 cm deep. Simply place bulblets point upwards every 2–3 cm. Mulch to prevent proliferation of adventive plants that could smother young shoots.
These bulblets will slowly develop. Just watch watering if necessary.
What next?
Following summer, from late July or in August, bulblet foliage will normally have yellowed. This is time to dig up bulblets… to replant them. At that stage they form a round, that is, a single bulbil, more or less large.
These rounds are replanted the same way, a little deeper, and more spaced if they have grown. This transplanting takes place in September–October.
Following summer, cut flower stalk that will form. And again dig up bulblets. And possibly replant them.
This operation can continue for another year, even two, until obtaining well-filled bulbs made up of 5 to 10 bulbils.


Comments