


Grafting trees: different techniques
and our explanations to help you succeed
Contents
Grafting is a method of propagation very often practised on fruit trees and roses but also on horticultural plants difficult to propagate by cutting or that grow poorly in our soil. It is sometimes performed on annual plants such as tomato or aubergine, to obtain stronger young plants.
Grafting consists of joining a shoot or a bud of the selected variety, called scion onto a rootstock, adapted to the soil or that will confer a certain vigour to the young plant (low for a cordon-trained fruit tree, high for a free-standing tree) or that shows resistance to certain diseases, as with American rootstocks resistant to Phylloxera in vine. Grafting also allows changing variety of a well-established tree while benefiting from its root system or rejuvenating a tree. This is a so-called “vegetative” propagation since it uses an organ (shoot or bud) that must come from a healthy young plant so as not to transmit disease. It allows reproduction of scion genetic material.
There are several ways to graft, which vary according to season, species to be grafted, size of rootstock. They also vary according to local habits, skill of the grafter, availability of scions…

Cleft graft
This grafting technique is popular with amateur gardeners because it is relatively easy to carry out since all operations can be performed at the same time. Professionals rarely use it except to train trees to a single-stem form using a variant called “terminal cleft graft”.
The cleft graft has the drawback of being mutilating because it requires splitting the rootstock, producing a rather unsightly graft bulge.
When to carry out a cleft graft?
It is generally done at the end of winter when the rootstock begins to wake, when buds swell and show a hint of green. This starts in February (almond tree) and finishes in April (cherry tree) but most of these grafts are carried out in March. They are also carried out in late September–October on cherry trees and plum trees with well-lignified shoots.
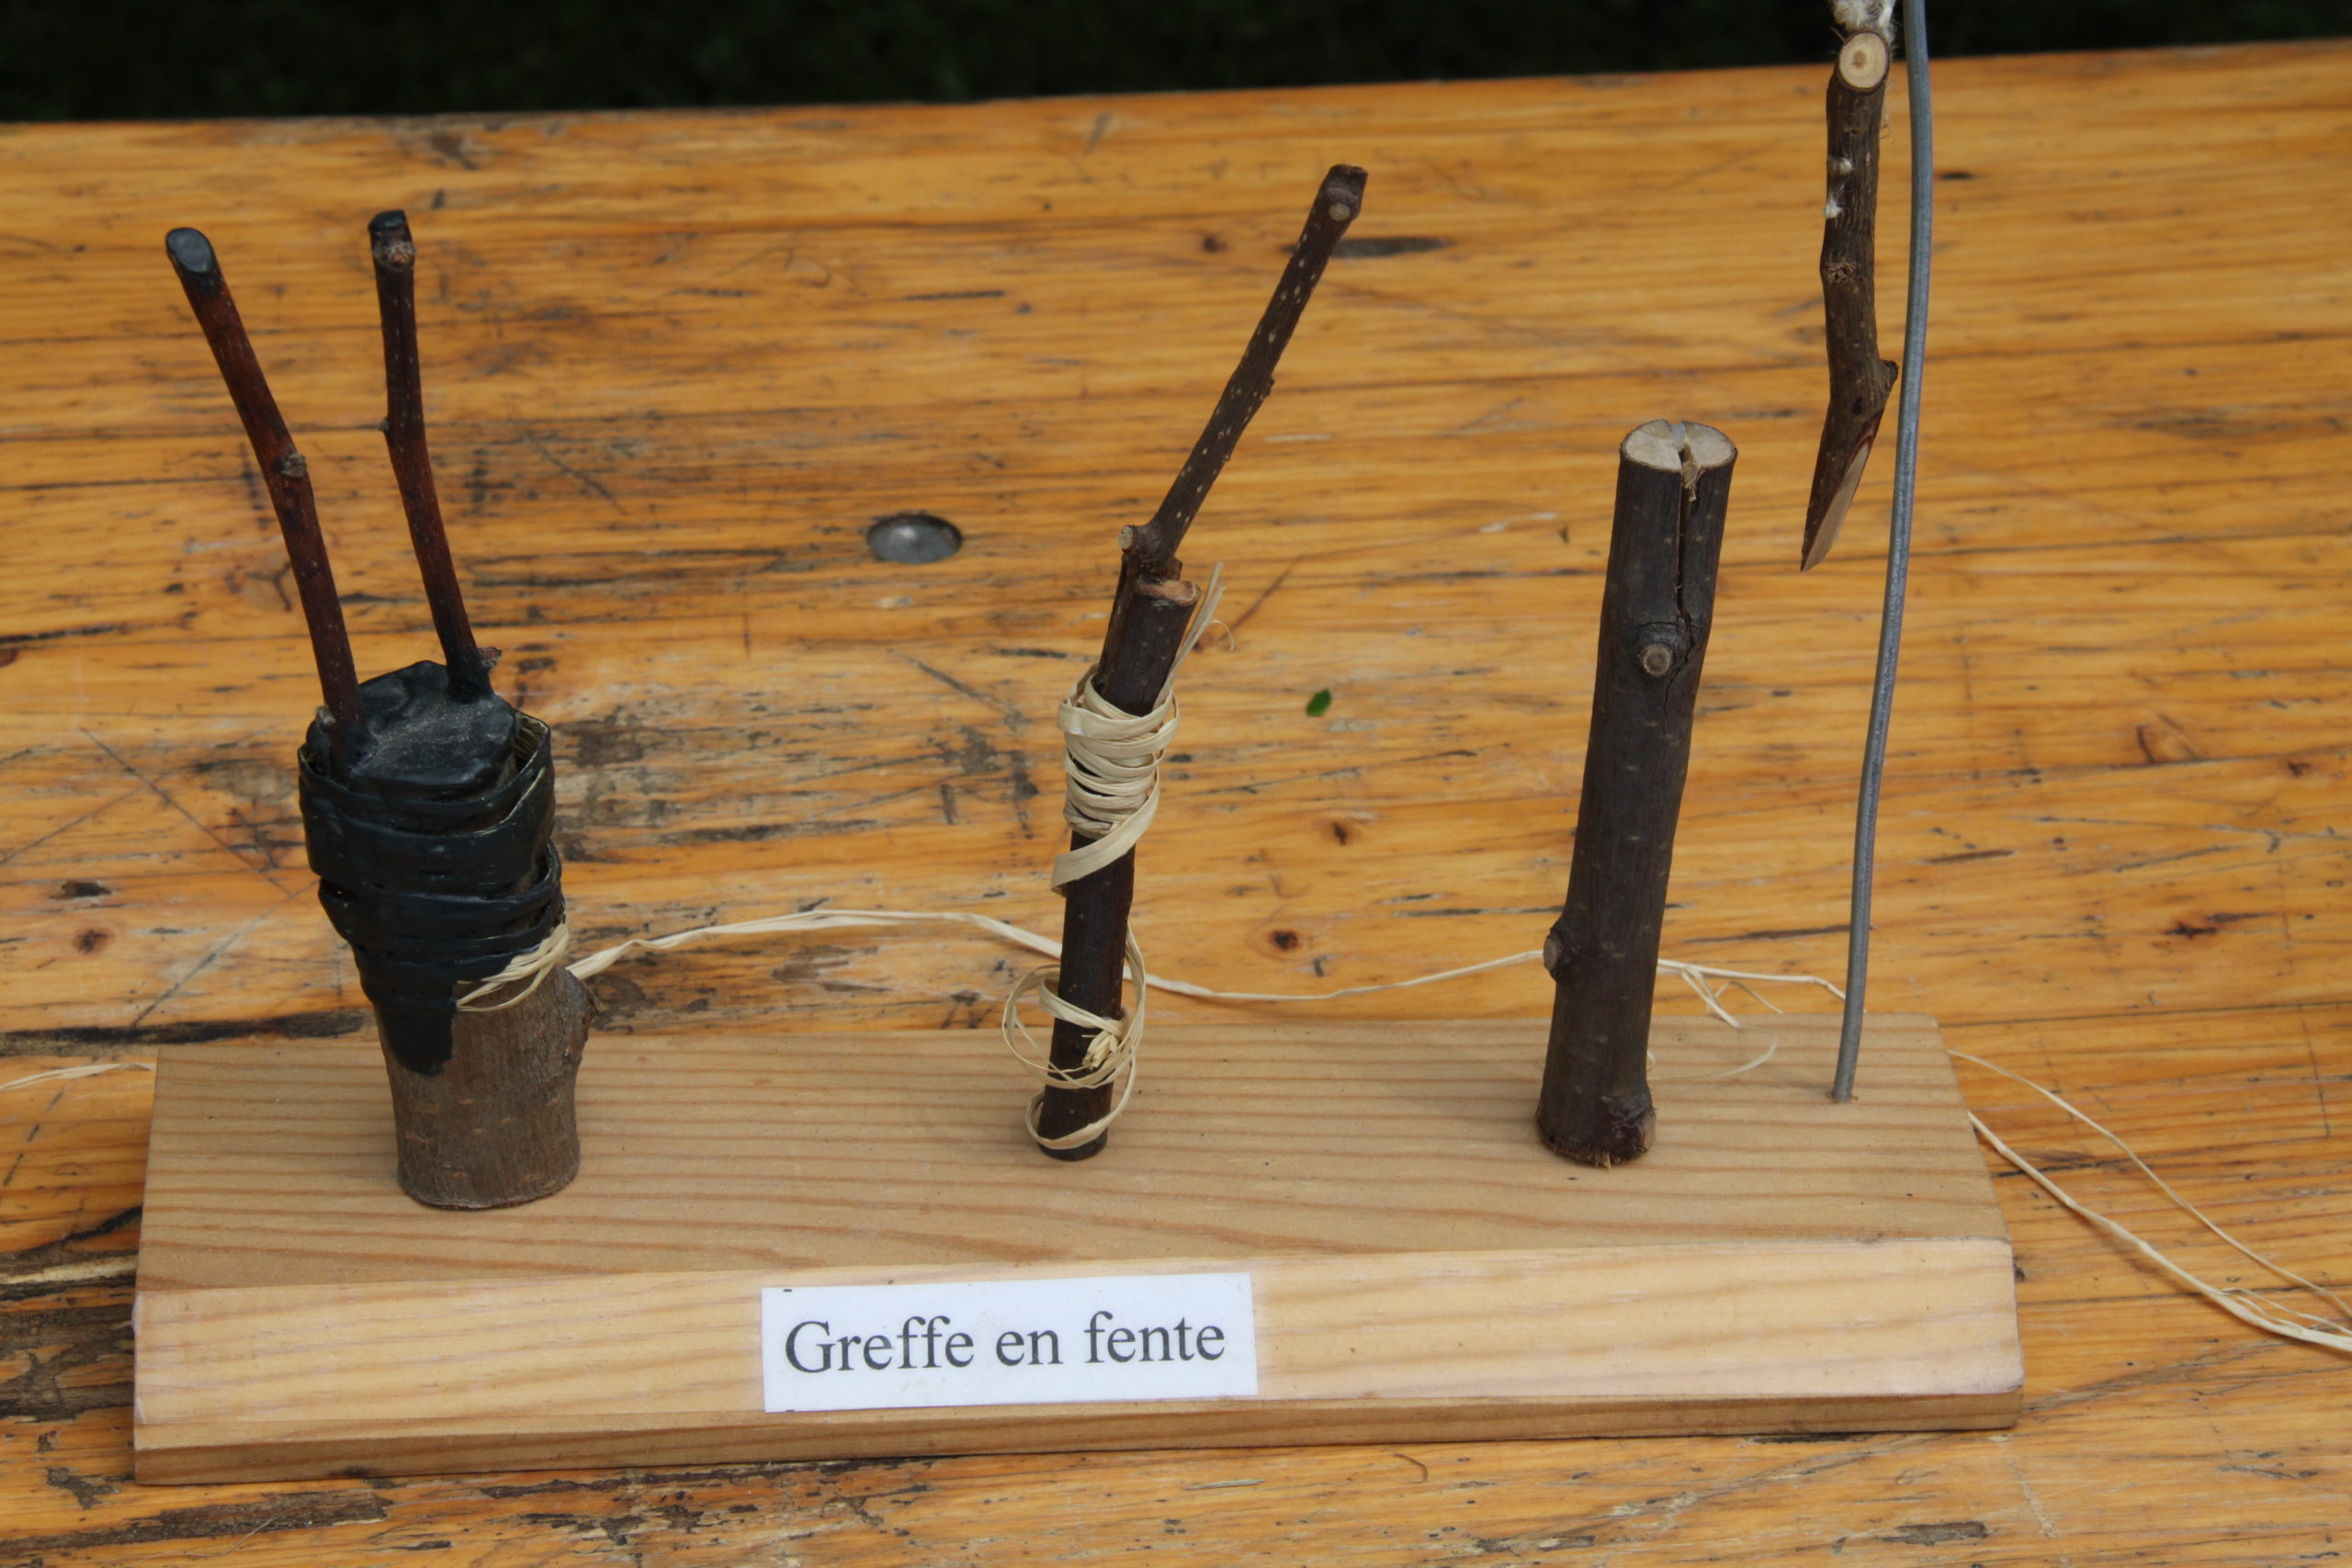
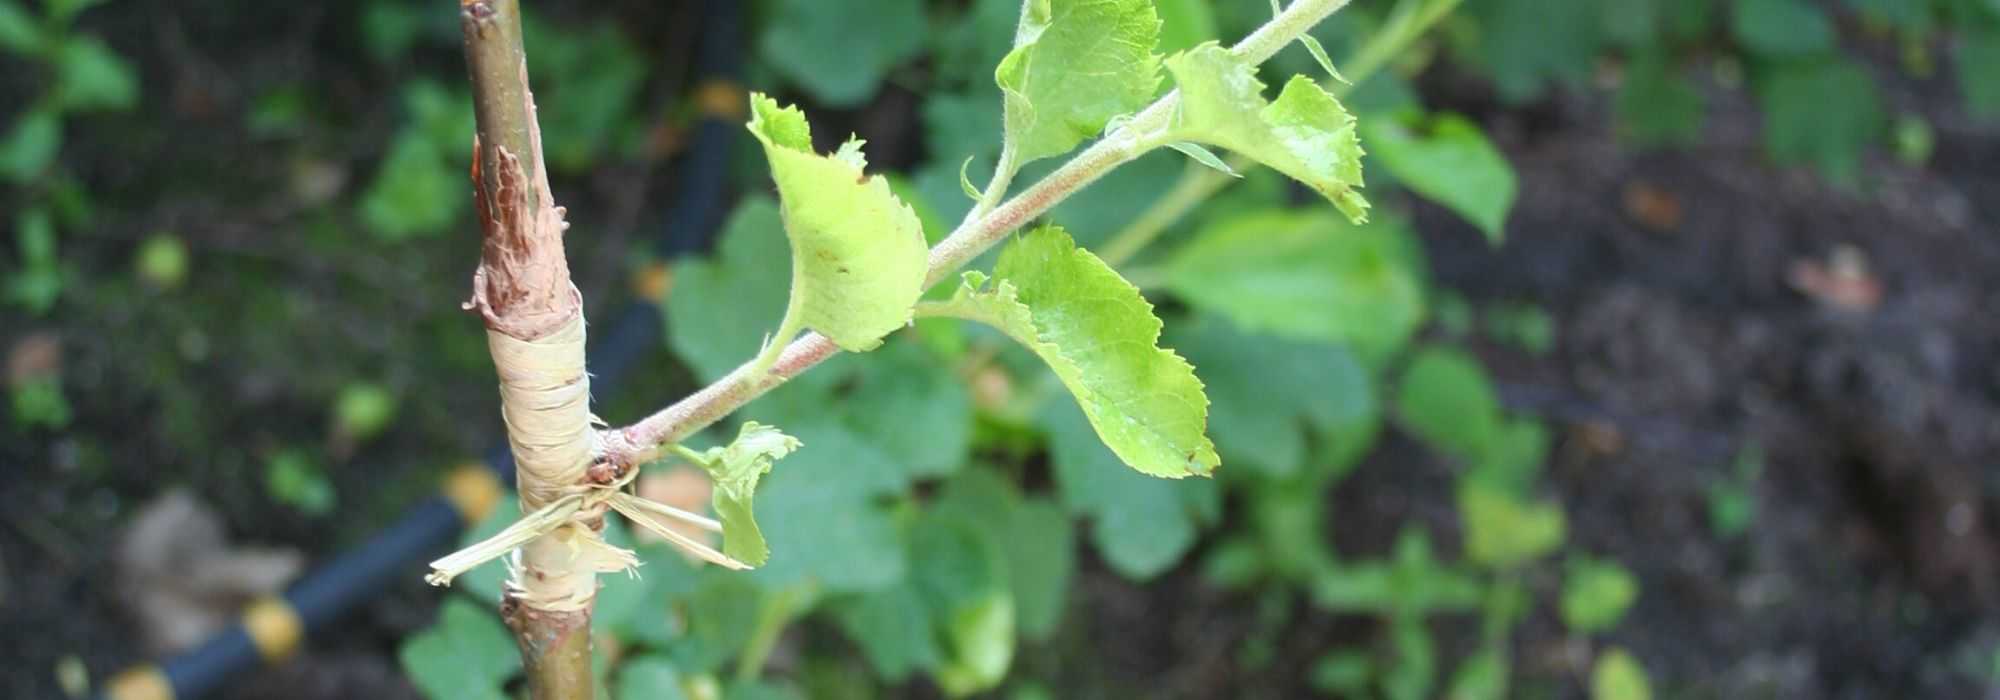
Examples of cleft grafts
How to perform a single or double cleft graft?
Preparation of the rootstock :
This can be done at the time of grafting or during winter with the wound refreshed at the moment of grafting.
- Choose a rootstock with a diameter between 1 and 5 cm. This may be the main stem or a fairly upright branch.
- With a well-sharpened pruning shear, cut the trunk or branch of the rootstock at the desired grafting height and perpendicular to the axis.
- Using the heel of a grafting knife or a pruning knife, split the centre of the rootstock stem to a depth of 3 to 5 cm.
Carrying out the graft :
- Take the scion, a one-year section of shoot (last season’s growth), containing 2 or 3 buds.
- Cut about 2 cm below the basal bud.
- Either side of the bud, make a double sloping cut, starting 5 mm below the level of that bud. Make a single clean, precise stroke with a well-sharpened pruning knife or grafting knife. The bevel should taper towards the base to ease insertion into the rootstock cleft.
- Insert a wedge (blade or screwdriver) into the cleft to slightly spread the sides, then push the beveled scion in firmly, not in the centre but towards one side of the cleft. The thin cambium layers, slightly darker or greenish, just under the bark must be brought into contact so they can fuse. As a precaution, you can tilt the scion slightly to ensure these two layers meet.
- Remove the wedge.
* cambium : layer of cells of the stem, located just under the bark, capable of multiplying and forming a callus to cover wounds or fuse two organs.
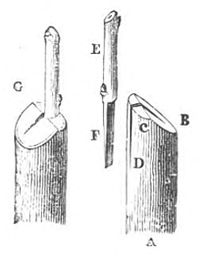
Diagram of a single cleft graft
Finishing touches
- Bind firmly with grafting rubber Flexiband, electrician’s tape or even dampened raffia to ensure total immobility of the two parts. Raffia is criticised for not remaining flexible enough, which requires cutting it once the union has formed (about three weeks later).
- Then seal all exposed tissues, taking care not to coat the Flexiband, which must receive sunlight to degrade over time. Generously coat the whole union area (the entire section of the rootstock) and the end of the scion to limit drying out. Avoid coating the area bearing the scion’s buds.
- It is wiser to install protection for the graft against birds (wire mesh, a section of plastic bottle, etc.).
- Regular disbudding of the rootstock is essential so the rootstock does not outgrow the scion.
Important: If the scion diameter is much smaller than that of the rootstock, insert a second scion opposite to perform a double graft. The less vigorous scion should be pruned very short and regularly, leaving a few leaves and buds so it helps to heal the rootstock wound. It will be cut back flush once the wound is completely covered, which can take 1 or 2 years.
Good to know: with evergreen species, cut back the lamina of the scion’s leaves and cover the graft with a transparent plastic sheet for several weeks.
Read also
Layering: how to do it?Crown grafting
Crown grafting is a relatively simple technique, but one that requires precision and prior collection of grafts. Do not hesitate to increase number of grafts on rootstock to improve chances of success. It is used to give a new lease of life to old pome fruit trees in particular that no longer produce, or to change variety of an adult tree. It is more delicate on stone fruit trees which have a very thin cambium.
When to carry out crown grafting?
Crown grafting is carried out shortly after cleft grafting, when sap has risen in the rootstock so that the bark lifts easily:
- late March for cherry and plum trees,
- early to mid-April for apple and pear trees, or even May depending on region.
Weather should not be too warm so as not to stress the tree.
Note, grafts are collected in winter (late January to early February), while trees to be propagated are still dormant!
How to prepare the grafts and the rootstock?
- Cut with a disinfected pruning shear grafts of a diameter similar to a pencil, either one-year shoots measuring 20 to 30 cm long or wood aged 2 or 3 years bearing weaker one-year shoots. Ensure they bear healthy wood buds (pointed). Do not confuse these with rounded buds which will produce only flowers.
- Make a bundle which you bury in moist sand against a north-facing wall or keep at bottom of refrigerator wrapped in moist moss and plastic until grafting operation.
- Preparation of the rootstock can be done in winter or at grafting time. It consists of cutting back the already-rooted rootstock, almost at the start of its scaffold branches (15 cm from trunk) and on axes between 3 and 15 cm in diameter. Use heavy pruning shear or a pruning saw. Remember to leave a few underdeveloped branches on these scaffold branches to act as sap-suckers.
- Make cuts well perpendicular to the axes and do not hesitate to increase number of grafts on the tree if you have sufficient grafts.
Good to know: a grafting point located 20 cm from the soil gives more vigour to the graft than if located higher. Removing suckers on the rootstock is also less tedious.
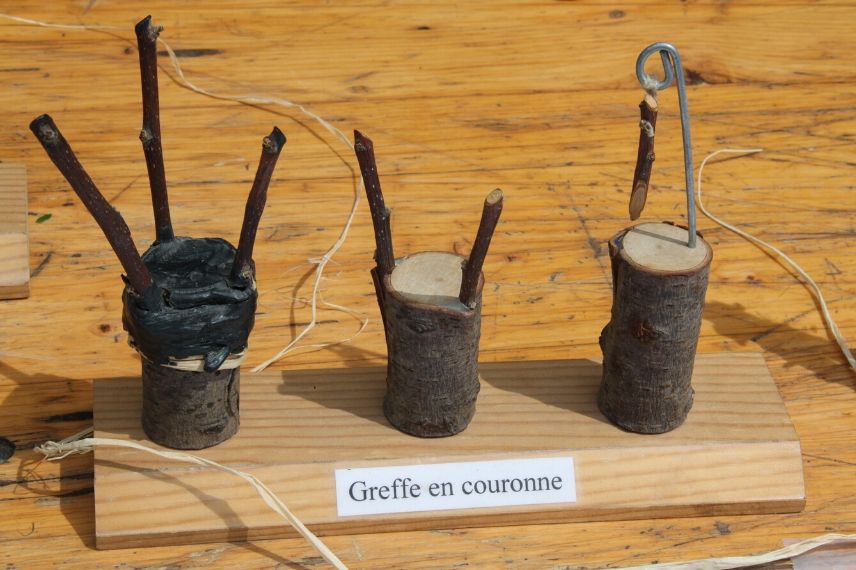
Examples of crown grafts
How to perform crown grafting?
- About two months after cutting back the rootstock, the tree having begun to heal, remove grafts from the sand and re-cut them keeping only the central section of the shoots about 7 cm long and bearing 2 wood eyes.
- Cut the tip of the graft on the slant, a few millimetres above the 2nd eye.
- Re-cut the base of the graft as a bevel, on the opposite side to the 1st eye, on one side only over 2 to 4 cm in length.
- Then make on one side of the bevel a second shallow longitudinal cut (grazing the liber, layers of cells located just above the cambium). This cut will be placed in contact with the edge of the bark not lifted from the rootstock.
- Freshen wounds on the rootstock to expose slightly oozing green tissue.
- Make a vertical incision in the rootstock bark 3 to 4 cm long, all around the axis so as to receive 3 to 5 grafts. The incision, a few millimetres deep, reaching the branch cambium, should only serve to loosen the bark.
- Loosen the bark only on one side (the same side for all grafts on the same axis) with the spatula of the grafting knife, then slide the graft in with slight force, applying the second cut against the non-lifted bark.
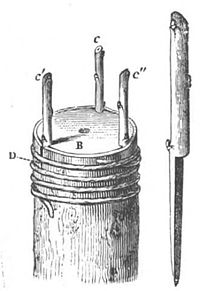
Diagram of crown grafting
Finishing touches
- Tie firmly but without strangling all grafts on the axis with moistened raffia or Flexiband, applied from top to bottom.
- Generously seal all exposed tissues with grafting putty.
Regrowth of grafts on an old tree is generally rapid and vigorous while healing remains fragile, so it is recommended to attach auxiliary ramified branches to each axis to prevent birds from perching on the grafts. You can also add newspaper covered with plastic to protect grafts from sun for 3 weeks. New shoots can bind to auxiliary branches to avoid breakage due to wind.
- The following winter, select grafts that have taken: keep one per grafting area, the straightest and most vigorous, then cut it back to 20–30 cm from the graft to encourage ramification. Other grafts are gradually cut back until wounds are fully covered.
- Debud rootstock regularly so it does not take over.
Discover other Trees and large shrubs
View all →
Available in 0 sizes

Available in 1 sizes

Available in 1 sizes

Available in 1 sizes

Available in 1 sizes

Available in 1 sizes

Available in 1 sizes

Available in 1 sizes

Available in 1 sizes

Available in 1 sizes
Shield graft
Shield graft is a technique widely used by professionals because it is minimally damaging to the rootstock, can be performed in two periods with relatively little plant material. It applies particularly to stone fruit but also to pome fruit and to roses for which the rootstock was planted the previous winter. The shield graft is slightly more delicate to carry out than a crown graft and carries a higher risk of failure. Bark must be able to peel away easily. It is generally practised on the rootstock a few centimetres above ground (fruit scions) or at the end of a shoot 1.20 to 1.50 m long.
When to perform the shield graft?
Depending on species, the shield graft is carried out in spring or summer :
- In March, before buds swell, this is called a graft “with an active eye”, as growth resumes in the weeks that follow. Scions are taken in late January–early February and stored at 4°C in a plastic bag. The graft with an active eye is also practised in southern France between early June and early July, using only slightly lignified scions taken at the same time.
- From mid‑July to early September for grafts “with a dormant eye”, as shoot growth will not occur until the following spring.
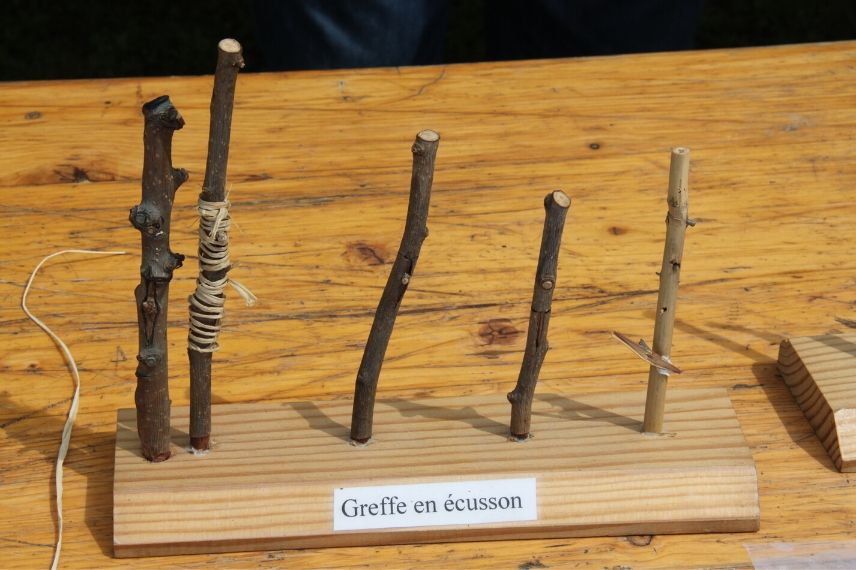
Examples of shield grafts
How to prepare scions and the rootstock?
- A few days before grafting, water the rootstock thoroughly so that its bark can be detached easily.
- For grafts with a dormant eye, at the time of grafting or a few days before, choose a well‑ripened shoot of the year (hard and brown) with healthy eyes (wood buds) of the variety you wish to multiply. Cut this shoot; it should be the diameter of a pencil.
- Cut off the lamina of all leaves immediately while keeping the petiole to avoid dehydration of the buds.
- Soak the base of the shoot in a glass of water a few hours before grafting.
Good to know: To keep this defoliated shoot for a few days, wrap it in a damp cloth, then place it in the bottom of the fridge.
How to carry out the shield graft?
- Choose a well‑formed eye on the scion, preferably near the centre of the shoot, in the axil of a leaf or a leaf scar.
- Using a grafting knife, make incisions about 1.5 cm below and above the eye, then slide the blade of the grafting knife under the bark from top to bottom, without cutting too far into the wood.
- Once the shield has been taken, turn it over and remove the wood strip if necessary with the grafting knife’s spatula.
- On a clear area of a rootstock shoot, make a fairly superficial T‑shaped incision (down to the cambium). Gently peel back the bark on both sides with the grafting knife’s spatula.
- Slide the shield into the notch then trim horizontally the upper part protruding from the T so that the edges of the respective barks are well applied against each other.
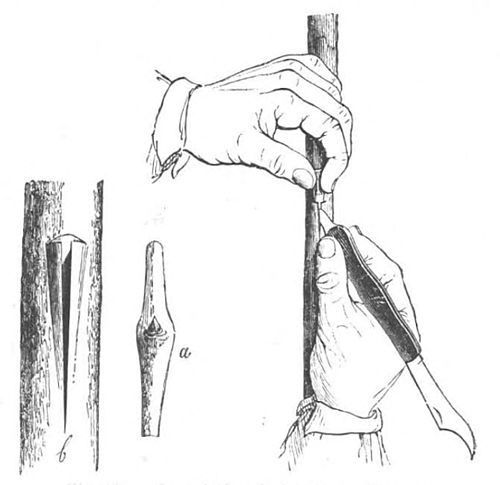
Diagram showing how to carry out a shield graft
Finishing touches
- Bind the graft with Flexibands or damp raffia so that tissues are well applied one against the other, taking care not to cover the bud.
When the graft is successful, the petiole left on the scion falls off after 15 days.
- Cut the binding once the variety has grown by at least 5 cm.
- In case of shielding with an active eye: cut back the rootstock above the shield 10 days after grafting.
- In case of shielding with a dormant eye: wait until the scion shoot in spring reaches 30 cm, then cut back the rootstock to 15 cm above the graft point and tie the shoot to that stub.

Carrying out a shield graft
Read also
5 ways to get plants for freeSaddle graft, also called inverted cleft graft
This type of saddle graft is particularly used on Rhododendrons and Azaleas but can also be carried out on fruit trees provided a shoot of the same calibre as the rootstock stem is grafted.
When to perform a saddle graft
As with cleft grafting, shoots of desired variety are taken at time of grafting.
How to perform a saddle graft?
- Form a double bevel 3-4 cm long on the rootstock stem using a well‑sharpened, disinfected knife or grafting knife.
- Then split the scion shoot with two blade cuts so the two parts fit together perfectly.
- Then bind the whole assembly.
Drawing of an English saddle graft or inverted cleft graft on a rhododendron
English-style graft
Whip-and-tongue graft requires almost no preparation, but can only be performed if rootstock and scion are the same diameter, and if this does not exceed 5 cm.
The Complex whip-and-tongue graft is a variant easier to perform than inlay graft.
When to carry out whip-and-tongue graft?
It is generally done in early March when sap begins to rise or in September. It is carried out in orchard on a mild day or on a bench with uprooted rootstocks. Collection of scion shoots can be done just before grafting provided buds have not yet burst.
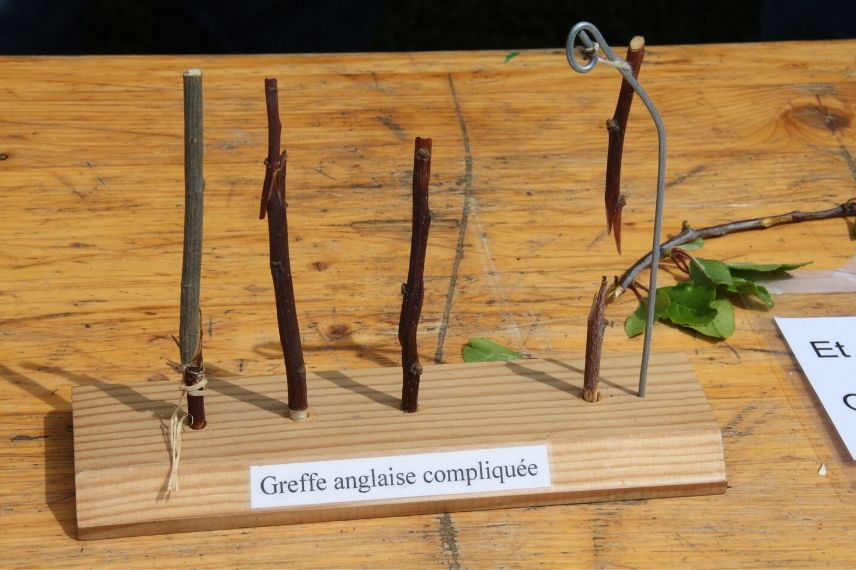
Examples of complex whip-and-tongue grafts
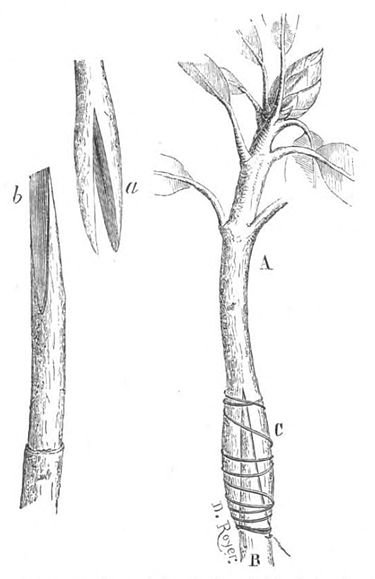
How to make a whip-and-tongue graft?
- Use sections of one-year-old shoots (corresponding to last season’s growth), bearing two eyes (woody buds). Suckers, those vigorous vertical shoots that bear only woody buds, are ideal. Rootstock should have a diameter close to that of the scion unless performing a double graft by placing two scions either side of the trunk.
- Make a pruning cut at an angle on both rootstock and scion then, to give better hold between the two parts, split the two bevels vertically so they interlock well.
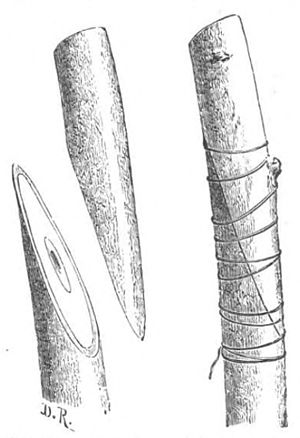
Drawing of a whip-and-tongue graft
Finishing
- Bind the graft with grafting rubber bands (Flexibande) or electrician’s adhesive tape.
- Seal all wounds around the graft including the top of the scion, taking care not to cover the elastic band so that sun can degrade it in time.
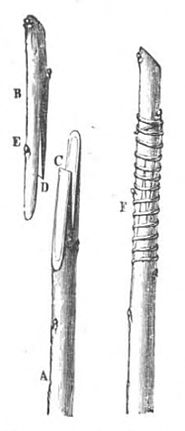
Drawing of a complex whip-and-tongue graft
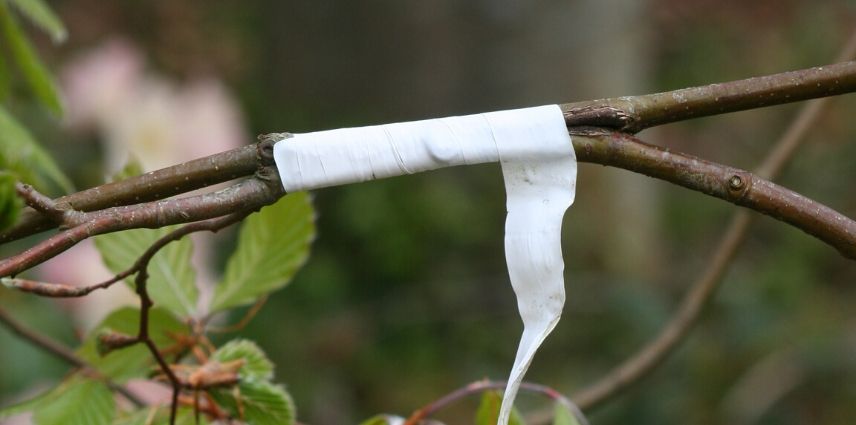
Approach grafting
This type of graft tends to mimic nature, as it is not uncommon to see two branches or trunks fuse when they have grown close. It is therefore fairly simple to carry out provided the variety is in a pot that can be placed close to the rootstock. This technique is mainly used for ornamental conifers, plants that are difficult to propagate such as magnolias and camellias, or to restore vigour to an old fruit tree.
When to carry out approach grafting?
When the two plants are actively growing (sap flowing).
Carrying out an approach graft
How to carry out an approach graft?
- Place the variety serving as scion with its pot at the base of the rootstock.
- Remove an identical strip of bark, 2 to 3 cm long, from young, still-flexible shoots on both the rootstock and the scion.
- Bring the wounds together and bind firmly.
- When the two parts have fused, at the end of the following winter, cut the rootstock above the union and the scion below it.
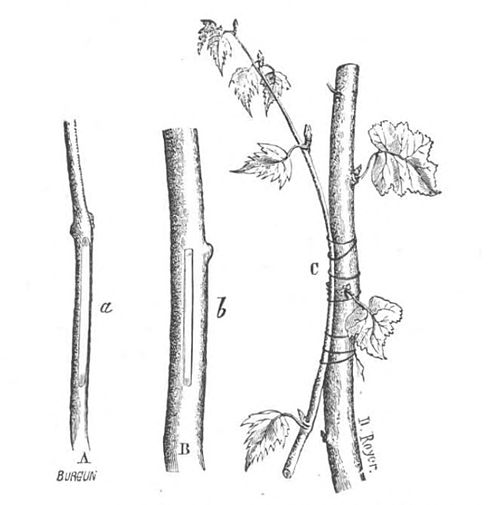
Drawing of an approach graft
Drawings taken from the book “L’Art de greffer” by Charles Baltet (1869) which you can consult here : L’Art de greffer on Wikisource, the free library.
- Subscribe!
- Contents

Comments