


Berberis, also known as barberry, is a spiny bush with deciduous or evergreen leaves much prized for its decorative foliage, yellow or orange flowers and red berries. There are many varieties, with foliage available in a beautiful palette of colours: light green, gold, red, purple... Propagation by cuttings is the best technique to multiply Berberis and obtain new young plants. In this tutorial, we explain when and how to propagate Berberis, and which equipment to use.
For full details on its cultivation, see our complete fact sheet: "Berberis, barberry: plant, prune and maintain".
When to propagate Berberis?
Propagation by cuttings is generally carried out in summer, between June and August. During this period, shoots are still young and flexible, which makes cuttings easier to take. It is also possible to take semi-lignified cuttings in late summer or early autumn, when shoots begin to become lignified. However, success rates are usually higher with herbaceous cuttings taken in summer.
Equipment needed
To propagate Berberis, you will need the following equipment:
- A clean, sharp pruning shear
- Pots
- Compost for sowing and propagation by cuttings (or a mix of compost and sand)
- A pencil or small stick
- Plant hormone for cuttings (facultative)
- A clear plastic bag or a plastic bottle
- A watering can fitted with a rose
How to do it?
To propagate Berberis, follow these steps:
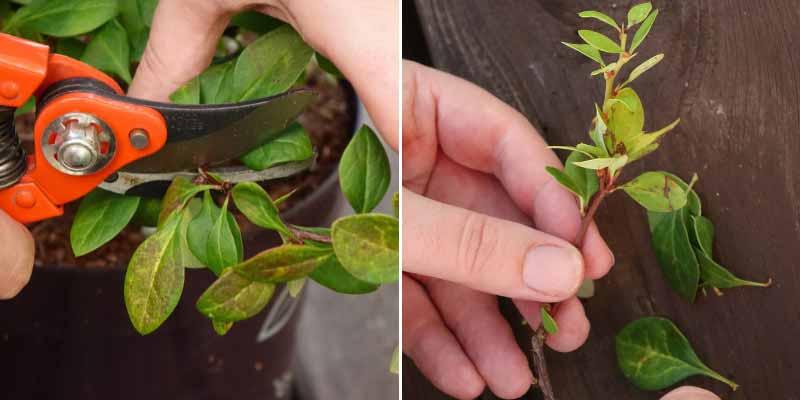
- Choose a healthy, vigorous plant from which to take cuttings. Select non-flowering shoots about 10 to 15 cm long, with at least three nodes (leaf insertion points). Using a clean, sharp pruning shear, cut stems just below a node.
- Remove leaves from lower part of the cuttings, leaving only upper leaves. This reduces transpiration and prevents cuttings from drying out.
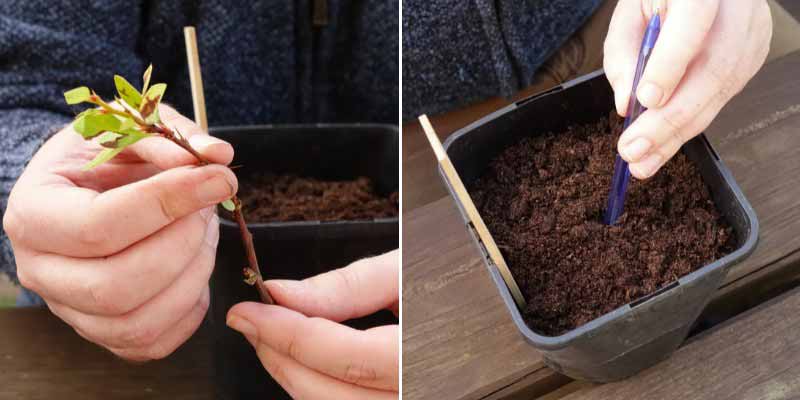
- Dip base of cuttings in plant hormone for cuttings (facultative) to aid rooting.
- Fill pots with a light, free-draining substrate, ideally seed and propagation by cuttings compost. Slightly moisten substrate before planting cuttings.
- Use a pencil or small stick to make holes in the compost
- Plant the cuttings, ensuring nodes are in contact with the substrate.
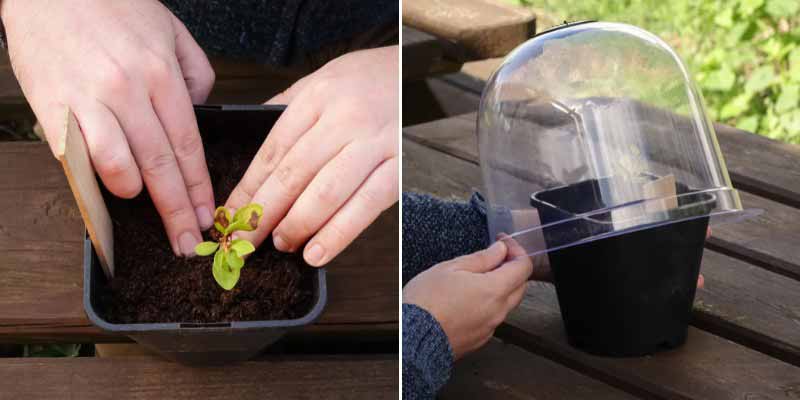
- Firm compost lightly around the stems
- Water the substrate.
- Place cuttings in a bright spot, sheltered from direct sun.
- Keep compost slightly moist and provide good ventilation to prevent disease.
- You can cover cuttings with a clear plastic bag or a plastic bottle cut in half to create warm, humid atmosphere conducive to rooting.
- After a few weeks, cuttings should begin to produce new leaves, indicating they have rooted. At this stage, gradually remove plastic cover and start to space out watering.
- When young plants are sufficiently developed (usually after 6 to 12 months), transplant into individual buckets, then plant out in open ground in autumn.


Comments