


With their fragrant clusters of violet, white or even pink flowers, wisterias are one of the most beautiful odes to emerging spring! These generous climbers can be grown from north to south of France. To duplicate them in garden and create a scented tunnel or arch at little cost, this tutorial explains best way to do it: layering!

Why favour layering to multiply wisteria?
It is possible to try grafting wisteria in March, a technique not necessarily easy for everyone. Heel cuttings (propagation by cuttings) in late summer are also an option for this beautiful climber. But layering is recommended for producing offshoots of wisteria largely because wisterias often layer naturally, thanks to stems lying on soil. It is also fastest method to multiply it: within a year a new plant emerges from soil, and although term "layering" may sound daunting, process is reliable and almost foolproof. Remaining attached to mother plant is indeed a considerable help for new plant to produce roots.
N.B.: one point to take into account is that grafting produces fastest flowering after planting for wisteria, although layering gives satisfactory results.
Can all wisterias be layered?
Yes! Chinese wisterias (Wisteria sinensis) and Japanese wisterias (Wisteria floribunda) are layered in same way.
When to layer wisteria?
Ideally carry out operation in May, during summer or early autumn, when stems are flexible.
How to layer wisteria?
Equipment
- hoe
- a grafting knife, disinfected
- a U-shaped peg (sardine-type), a stone or a large cobble
- a little sand to lighten substrate
- a small stake (facultative)
Technique
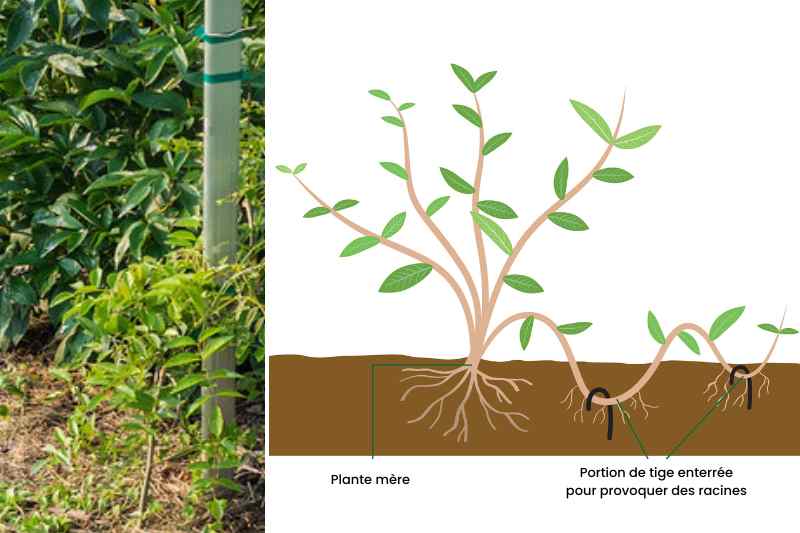
- Locate one of the longest shoots originating from base of wisteria. Shoot must be healthy and vigorous.
- Prepare the layer: remove small leaves from the shoot along whole length that will be put into soil, about 20–30 cm, then make a shallow incision to encourage root formation.
- Prepare soil by loosening it and removing adventive plants and any roots present, then create a 5–10 cm deep furrow to lay shoot in.
- Place prepared section of shoot in contact with soil, bending it enough so it is well buried; cover with a layer of soil enriched with potting mix, lightened with a little sand, firm lightly.
- Secure layer using a U-shaped peg or, if unavailable, a large stone.
- Raise end of aerial shoot and stake it if necessary using a small stake (50 cm).
- Water regularly, without excess, throughout rooting period: soil must not dry out; roots will develop provided soil remains fresh.
- Shoot will have rooted after one year: to check, look for appearance of new shoots on layered young plant.
- New young plant can then be "weaned" from mother plant by cutting shoot where it enters soil.
- Replant layered rooted young plant in pot or in its permanent position.
You can also try multiple layering, thanks to flexible stems of wisteria, from a single long stem to produce several young plants to replant as part of landscaping project for tunnel or arch.
Learn more
- Want to know more about layering technique? Follow Alexandra’s advice.
- Learn more about wisteria in our complete file: Wisteria: how to plant, prune and care for it. Also discover wisteria in our summer saga: Travelling plants: Chinese wisteria.
- There are other plants easy to layer! Read our sheet: 6 climbing plants easy to layer.
- Find our range of wisterias in our online shop.


Comments