


Layering: how to do it?
Different techniques and all our tips
Contents
Are you used to sowing or propagating your plants to multiply them? We invite you to discover layering, another propagation method that proves highly effective! It allows you to obtain new young plants simply by encouraging roots to form on a branch, then separating it from the original young plant. Discover in this fact sheet the different layering techniques and all our tips for success.

What is layering?
Layering consists of putting a section of branch in contact with soil so that it develops roots without even being separated from the mother plant. This way, it remains supplied with sap while it produces its own roots. You can then separate it by cutting the section of branch that still connects it to the mother plant, then replant it in a pot or in open ground.
Layering is a technique that works well for climbing plants, bushes and houseplants. There are different types of layering: air layering, simple (ground) layering, serpentine layering or mound layering. Choose the most appropriate method for the plant you wish to propagate. Generally, you can put the branch in contact with soil either by burying it in the ground or by placing just some soil against the branch (air layering). It is simply soil and moisture that will encourage root formation.
Layering is a method of vegetative propagation, so it preserves genetic characteristics of the mother plant. As with propagation by cuttings, it produces a “clone”, identical to the original plant. It is an easy technique to carry out, with a high success rate, and which requires very few tools. It allows you to multiply plants that are difficult to propagate by cuttings. In addition, it is a technique that presents low risk: the layer continues to be supplied with sap until it develops its own roots. It therefore requires little attention and care.
Main advantages of layering :
- High success rate
- Several plants can be obtained from the same mother plant
- Layering preserves genetic characteristics of the original plant
- Risks are low and the layer requires little care, since it remains supplied with sap while it produces its roots.
Read also
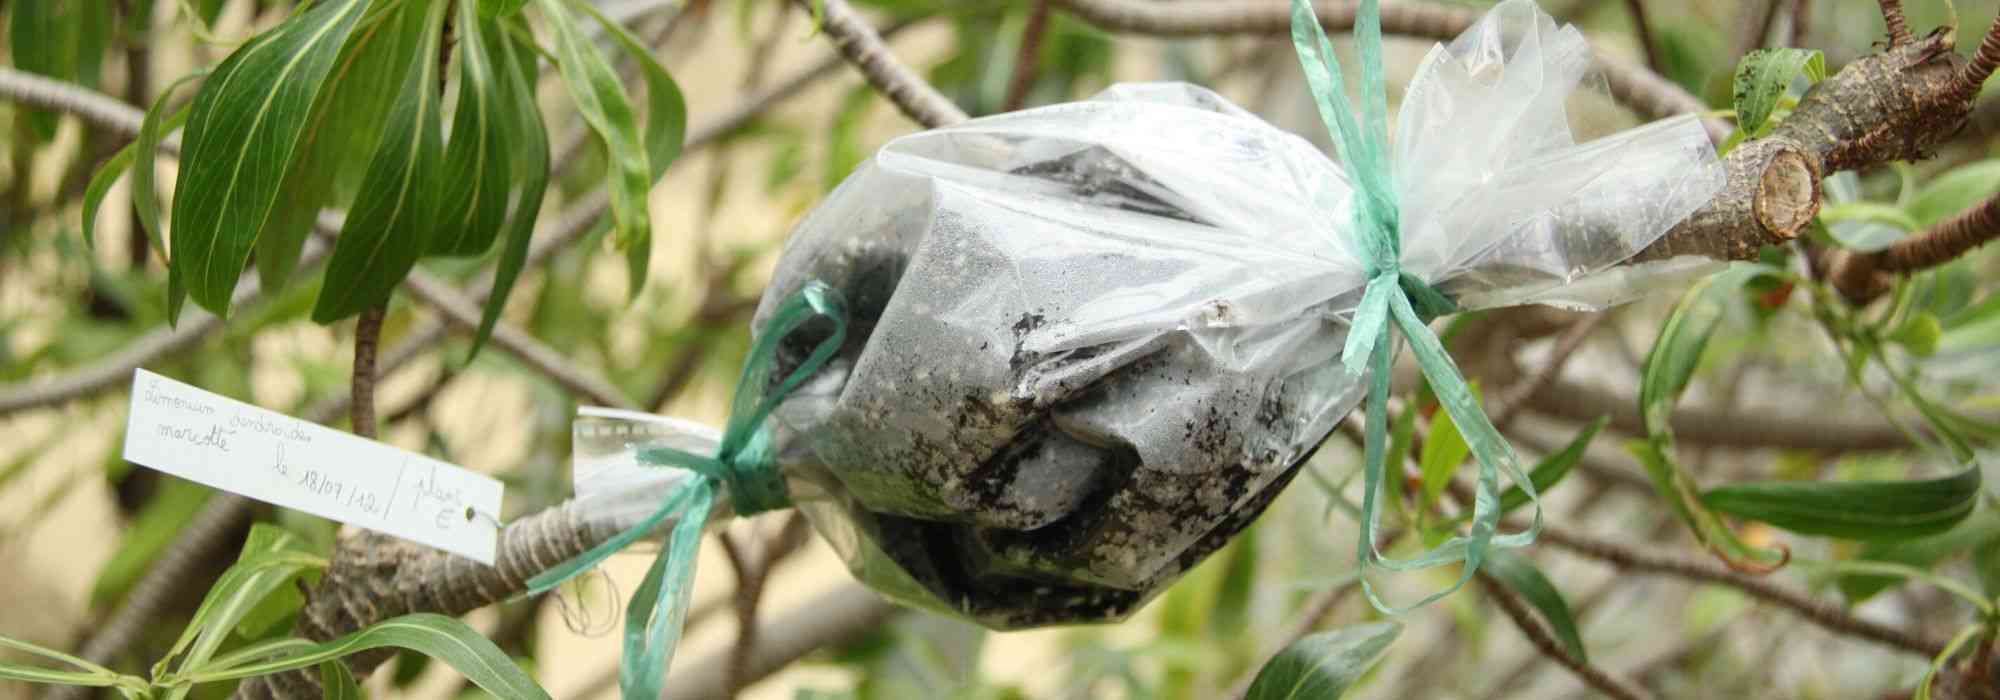
5 ways to get plants for freeAir layering
Which plants?
Use this technique for indoor plants such as ficus, rubber plant, dracaenas or philodendrons; it also works for viburnums, maples, oleanders, lilacs, hibiscus, roses… Air layering is a good solution for plants whose branches cannot be brought down to ground level without risk of breaking.
How to do it?
Outdoors, carry out air layering in late spring or summer so temperatures are warm enough. For indoor plants, air layering can be practised almost all year, but avoid periods of dormancy, especially winter.
- Choose a healthy, vigorous branch;
- Remove leaves from the section you want to air layer;
- Make two parallel cuts to remove the bark over about 2 cm width, and apply plant hormone for propagation by cuttings;
- Place base of a plastic sleeve a few centimetres before the incision. Secure base with adhesive tape or an elastic band;
- Fill the sleeve with moist potting compost or moss, then close it at its upper part, above the incision;
- Cover it with aluminium foil or any other opaque film to prevent light passing through (facultative);
- The branch will produce roots where it was incised. You can then cut it (just below the sleeve) and replant it in a pot.
Plants generally take at least two or three months before starting to produce roots. You can check from time to time: open the sleeve to see if there are roots and check that the substrate is still moist. If not, add a little water and close again.
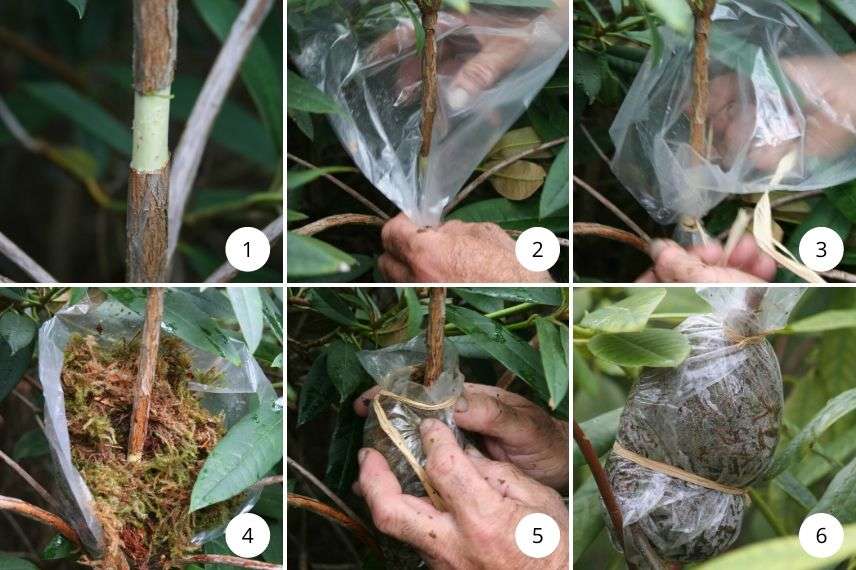
Air layering of a rhododendron : 1-Remove bark over about 2cm ; 2 and 3-Place a plastic sleeve and secure its base with raffia ; 4-Fill the sleeve with light potting compost or moss ; 5-Close the sleeve ; 6-Air layering complete
Stool layering
Which plants?
This technique is reserved for plants with branches long and flexible enough to be bent to the ground without breaking. It can be used to propagate rhododendron, clematis, hydrangea, flowering currant, climbing plants… It is also suitable for some indoor plants such as Scindapsus (Epipremnum aureum), which has very flexible stems.
How to do it?
We recommend practising this type of layering in summer, around July–August.
- Choose a long, flexible branch. Check it is flexible enough to reach the ground and then rise again;
- Dig a furrow in the soil close to the branch;
- Remove the leaves from the part of the branch that will be in the soil. You can also make an incision (a few centimetres wide) and apply plant hormone to increase the chances of success. Best to incise just below an eye;
- Lay the branch down in the furrow;
- Cover it with growing medium (you can use a mix of potting compost, well-rotted compost and sand) and secure it with a peg or a stone. The tip of the branch must remain above the soil: keep it vertical by tying it to a stake;
- Firm the soil to ensure good contact between the branch and the growing medium;
- Water thoroughly.
The segment of branch in the soil will take root. You can then dig it up, cut the branch to separate it from the parent plant, and replant it elsewhere.
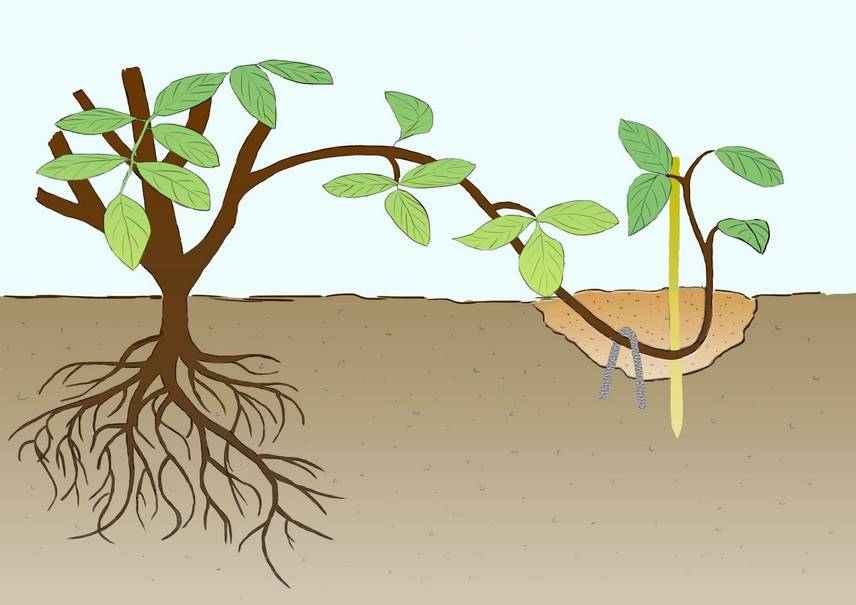
Layering by laying down involves bending and burying a section of branch
Read also
15 very easy plants to propagateSerpentine layering
Which plants?
Serpentine layering is used on plants with very long, flexible branches that can be bent to the ground at several points. Thus, with their voluble stems, climbing plants are well suited to this technique!
How to do it?
This is a variant of layering by couching: instead of burying just one segment of the stem, the same stem is buried at several successive points. This technique therefore yields a larger number of plants than simple layering by couching.
- Choose a very long, supple branch. Ideally a shoot from the current year, still young, that can be bent without breaking.
- Bend it down to the ground and remove leaves from sections you plan to bury. Make a cut on each of these sections.
- Bury these branch segments and hold them in place with hooks or stones. Tie the end of the stem to a stake so it remains upright.
- Firm the soil to ensure good contact between soil and branch, then water generously.
Each section will then be able to develop roots. In autumn, you can separate them from the young plant of origin and replant them in a new location.
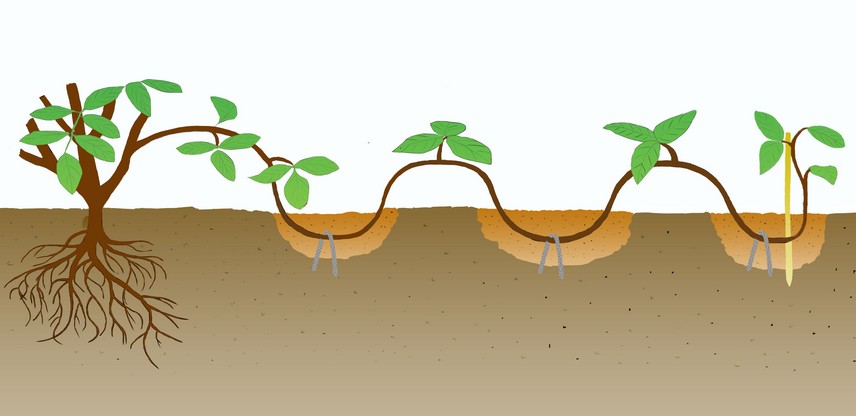
Serpentine layering is a variant of layering by couching: a branch is buried along several successive sections
Layering with coppice shoots
For which plants?
It is ideal for dense bushes that produce suckers at their base and whose branches cannot be bent to the ground. It is ideal for bushes with a « coppice shoots » habit. This technique is suitable for hazels, quince trees, currant bushes, plum trees, forsythias… Also for plants intended to form rootstocks. It makes it possible to obtain a large number of young plants.
How to do it?
This technique is also called layering by mounding, as it involves forming a mound of soil at the base of a bush to encourage roots to form at the base of the branches.
- In late winter, cut plant back, pruning branches to about 15 cm from ground.
- In April–May, form a mound over the stump, adding a mix of potting compost and coarse sand. Bases of branches can then root there.
- You can continue adding soil during the year to raise level of the mound.
- One year later, at start of spring, dig up branches and cut at base any that have developed roots. You can then replant them in a new location.
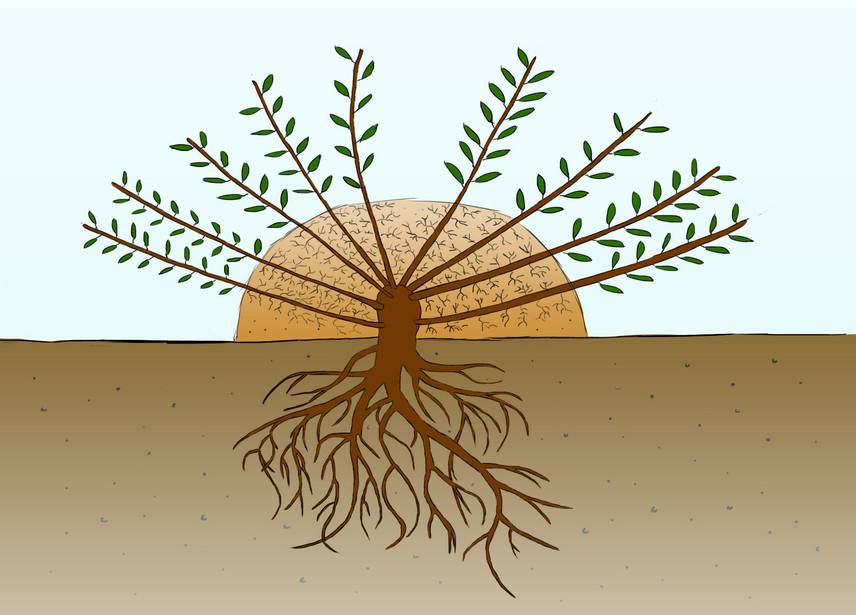
Layering by coppice shoots or mounding: soil is added over stump of a bush after cutting back its branches
- Subscribe!
- Contents

Comments